/* */ Beulah Bee: cardboard
Showing posts with label cardboard. Show all posts

April 03, 2022

No. 42


Recycle was the challenge over at Simon so I used the inside of a vintage portrait folder for a support, a layer of peeled cardboard, distress-stained parchment paper, a scrap of printed tissue paper, an altered metallic paper frame and one big, beautiful luna moth (Argema mittrei).


The moth image really inspired me (wouldn't it make a great stamp?) and it was printed, cut-out then mounted on a thick piece of cardboard and the edges were painted black.

I used a scrap of vintage lace and, while I can't explain it, I am always compelled to add dimensional dots which you'll see along one of the paper borders (Nuvo vintage drops). The text is a Clipping Sticker.

As always, I hope this post finds you well and happy and I appreciate your visit.

Until next time, take care.


April 11, 2021

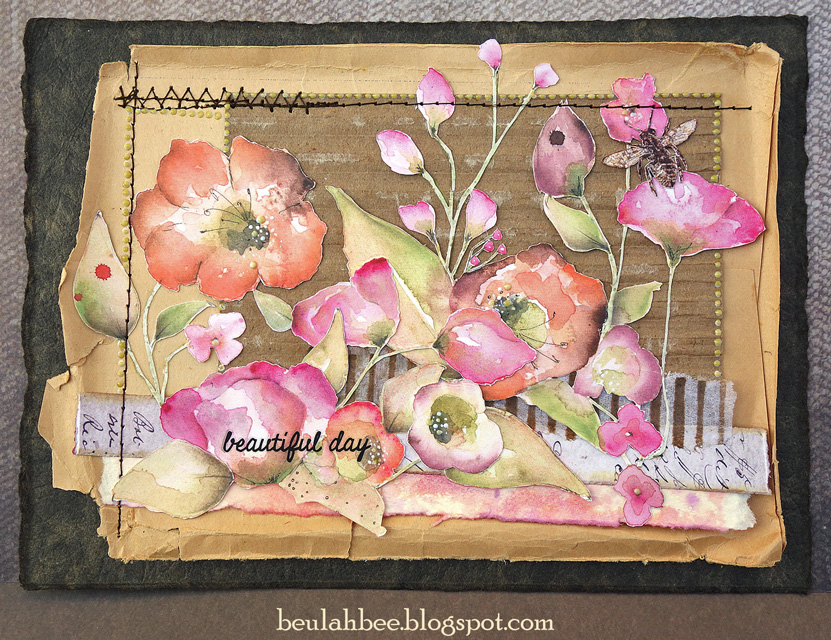
Beautiful Day

Greeting Card

Sharing an unconventional greeting card today--its support is a small vintage portrait folder with layers of papers--prompted by Simon's Monday challenge.

The flowers were fussy-cut from a paper pack called "Let Your Soul Bloom" (Moda Scrap 2019) grounded by strips of scrap paper, some delaminated cardboard and the backside of a really old envelope.

A bit of machine stitching and Nuvo Crystal Drops along with a Remnant Rub were used as embellishment.

As you can imagine, pasting all of this would have been a chore but I used a spray adhesive which makes it easier.

I'm sending this one to my good friend, Thelma, and it will need a padded envelope to survive the journey.

As always, I hope this post finds you well and happy and I appreciate your visit.

Until next time, take care.

March 24, 2021

Brainstorm

 Manila Tag 

 
A stripped layer of cardboard, a fussy-cut page from the Ephipany paper collection (Prima 2014), a vintage portrait (also fussy-cut) and my favorite book paper all tinted with inks and colored pencils are the ingredients used for this tag.
 
 
If you're inclined to use book paper in your art, may I recommend you search for a high-quality, very old book and you'll find that the paper will be strong, thick and tough enough to handle mixed-media techniques. Mine was an investment ($10 at a book fair), it has a leather binding and the pages have mellowed to a lovely color but are not friable.

The typewriter text was inspired by Simon's Monday challenge, this week it's using weather for inspiration. I looked inside instead of out and came up with "brainstorming."

As always, I hope this post finds you well and happy and I appreciate your visit.

Until next time, take care.

November 21, 2019

12 Tags for Christmas 2019 - Father Christmas


My first Christmas tag of the year features a vintage image of Santa mounted on kraft card stock and embossed with gold polka dots.

This close-up shows the glitter I applied on the banner, around the oval and on the tree branches.


I'm linking this post to Simon this week because the theme is "Recycle" and I've included some photos to explain.


The tag was made from the back of an empty drawing paper pad (I save all quality cardboard just for this purpose).


I pasted my laser-printed image onto some packaging material before cutting it out. The material had a slick surface so to make sure I got a good bond using my glue stick, I sanded the surface before applying the image.


And finally, I like to use scraps of craft foam sheets when I want to lift an image from the surface to create some dimension. I just cut it to size and use some glue.

Look for more Christmas tags in the days and weeks to come (it's only 34 days away) and if you'd like to see more tags from previous years, here's a link.

May 05, 2018

Moments in Time


Time. Oh what a topic and such a precious commodity! It's the theme at Simon this week and here's what I made.

Crafted from some Idea-ology bits (pocket watch, flowers) and the new Worn Wallpaper, it was assembled with a homemade box and basswood strips. The support for the pocket watch is a small wooden tag turned upside down.


A vintage image was placed under the dome of the watch and I embellished it with a ball chain. The quote is an image transfer.

February 26, 2018

I Know


Love this little miss and those doe-eyes--she's included in the latest release of Tim Holtz Paper Dolls. She's sitting inside a Mini Cabinet Card that I fussy-cut and behind it is the backside of the card that I tinted to provide a darker backdrop.

The frame's scrollwork was embellished with a Picket Fence Distress Marker and Glossy Accents along with dots made with Scribbles. The butterfly was stamped, cut-out, tinted and crackled.


My starting point for this tag was trying out the new Idea-ology Worn Wallpaper and an attempt to achieve a peeling effect. That's cardboard as the base filled in with texture paste to simulate the look of wooden laths and plaster.

A Clippings Sticker, more dots of Scribbles and a piece of Lace Trimming were also used.

October 07, 2017

One of Many


A walk on the dark side (Simon's Monday challenge for this week) prompted a tag made from Tim Holtz ephemera and a Clippings Sticker.


Why one of many? Well, let's see:

  1. One of many tags that I make.
  2. One of many from the popular technique of attaching butterfly wings to something.
  3. One of many bones in our bodies.
  4. One of many letters in the alphabet.
  5. One of many flowers in our garden.
  6. One of many elements in the periodic tables.
  7. One of many who perished this week by the hands of a mad man.
  8. One of many prayers said for an end to this insanity.

December 21, 2016

12 Tags for Christmas - November

Click for Larger View

Tim's November tag was a lesson in using Remnant Rubs as a resist and dimensional coloring. As with my original tag and again for this one, my rubs didn't resist in the same way Tim's did. I'm not sure why but think it may have something to do with how absorbent the background paper is.

My background is a little out-of-the-box in that I used a piece of delaminated cardboard (made by soaking it with water then peeling apart the layers). I like how it took the various stains I applied and puddled around the cardboard lines.


I used the white version of Tim's Christmastime Remnant Rubs, filled-in the background with random dots made with a Gelly Roll pen and added some vintage lace and a few seed pearls. The tag borders were hand-stitched with thick white thread after punching the holes on my machine.

I stamped my poinsettia (Penny Black, Christmas Star) on watercolor paper using red archival ink then tinted it and filled in the lines with some glitter paint. To make the flower coordinate more with the rubs I outlined the petal edges in white. The center is a Gumdrop tinted with Butterscotch and Wild Plum alcohol inks.

I have one more tag to go but don't expect to complete it before Christmas Day so with this post, I'm sending you my very best wishes for a safe and peaceful holiday that's full of good cheer!

November 22, 2016

12 Tags of Christmas - March


Here's tag number three of my Christmas versions of Tim's 12 for 2016. Each month he featured a technique remix and for March it was textures and dimensional die-cuts using cardboard.

I played around with my Mixed Media thinlet to see if I could cut a surface area larger than the original die to cover a section for the inside of a tree.


See the thicker line running up the left of center? That's my attempt to line up the die edge next to a previous cut. It was fun and challenging to use the die in this way and makes it more versatile.

The word bits are from this year's Idea-ology Christmas mini paper stash called Tidings and the packages were made from Christmastime ephemera.

Ranger's Stickles decorate the borders, Liquid Pearls created the texture you see along the cardboard ripples, I applied Glossy Accents to the package ribbons and a Mirrored Star tinted red with alcohol ink was the obvious choice for the tree top.

July 02, 2016

Condo


I've had trouble creating lately. I've shown up for the work but the results just weren't satisfactory. Hopefully, I've learned from my mistakes and the worst is over. It really has thrown me for a loop and even the purchase of a few new supplies didn't help!

So a thank-you is due to Maura Hibbits, who developed a tic-tac-toe board for this week's Monday challenge blog at Simon Says Stamp. Her clever idea allowed me to finally complete something and I opted to go all-in, using every element.


My tag is a layer of washi tape, corrugated cardboard stenciled with paste, birds stamped on fabric, sprayed and stained with blue and green distress inks and a light wash of gesso, some sequins, gold threaded ribbon and gel pen doodled dots.

I imagine it looks like an abstract bird condominium, hence the title of my blog post.

March 07, 2016

Simplicity


Tim's March tag inspired me to "remix" a layer of cardboard along with texture paste and paint splatters.


I used a stencil called Mini-Tatting by Rebekah Meier (TCW), Tim's Chit-Chat stickers and his new Ledger Script stamp (buried underneath the layers), along with some butterflies cut from Graphic 45 paper (Botanicabella).

Since the butterfly antennae are impossible to cut because they're so tiny I clipped a few strands from a black paintbrush and pasted them on instead.

November 07, 2014

Remember Paris


Inspired by Tim's November tag, I created this one using some of his techniques and also everything but the kitchen sink.

Oh wait! I did use the sink to wash off some ink at one point...

Click to Enlarge
It all started when I hand-cut a flower shape from corrugated cardboard, filled it in with paste medium and after it dried, added an image transfer on top which was then covered with clear crackle paint.

Ink pens, acrylic paint, oil pastels, and colored pencils were used to add color along with some splatters of gold embossing. The letters were hand-cut and then distressed with paint and crackle.

Tim's tag reminded me of inlaid parquetry and I was inspired to experiment!

April 04, 2014

Shabby Chic a la Morocco

I love a good challenge and Tim's tag for April was just that. Not using a die cutter means working the hard way but it forces me to think outside the box and makes for more original artwork. I always try to incorporate whatever technique he highlights but make a point to put my own spin on it.


This tag went through many transformations (thank goodness for gesso, the great cover-up) and I'd be hard pressed to say exactly how it was made. But the ingredients were corrugated cardstock, a modified stencil (courtesy of Lowes), an Exacto knife, various tissue tapes, acrylic paint, Distress inks, sand paper and a fine-tipped marker. My flower was made using a technique from Clare Buswell and the leaves were cut from watercolor paper.


I really enjoy Tim's monthly feature and had so much fun working on this tag. I am grateful for his inspiration as well as the opportunity to link up and I always look forward to seeing what others will make. Thanks for stopping by!