/* */ Beulah Bee: tissue paper
Showing posts with label tissue paper. Show all posts

April 05, 2023

Sensibility

The typewritten text from a favorite author was the inspiration for this tag made with an image transfer of a vintage photo, a scrap of Tissue Wrap and a Tim Holtz stamp (Mail Art).

As always, I hope this post finds you well and happy and I appreciate your visit.

Until next time, take care.


February 24, 2023

Sweet Prize

Today I'm sharing a tag inspired by, of all things, a new craft mat! (Which can only be said by one seriously bonafide and confirmed craft-nerd who, perhaps, should get a life?)

I started with a piece of scrapbook paper (Epiphany by Prima) for the background then layered scraps of Idea-ology Tissue Wrap, washi tape and stenciled tissue paper along with a hand-cut vintage image.

It was tinted with Distress inks and stenciled texture paste (Dot Fade by Tim Holtz). The text is a Clipping Sticker.

My trusty 10+ year-old Ranger Inkssentials craft mat was getting harder to clean and I didn't realize just how shabby it had become until I got a new one.

I keep it mounted on an inexpensive canvas panel with double-sided Scotch tape on the inside edges and strips of packaging tape around the outside edges. The back side of the panel is coated with gel medium to protect it from wetness.

This one is 9" x 12" and I use it most often but also have a larger one (14" x 18") mounted in the same way when I need a bigger work surface.

As always, I hope this post finds you well and happy and I appreciate your visit.

Until next time, take care.

December 12, 2022

No. 6 for Christmas, 2022

I used a Found Relative, a stamp (Mundo Holly, Ellen Hutson), printed tissue paper, scrapbook paper, a Remnant Rub, and glitter glues to make this tag.

I'm linking up to Simon's Monday challenge for this week's "Tag" theme.

As always, I hope this post finds you well and happy and I appreciate your visit.

Until next time, take care.

December 05, 2022

No. 5 for Christmas, 2022

I inherited multiple copies of professional portrait photographs of my great aunts and their relatives/friends (circa 1900-1940) mounted inside thick, tri-fold paper folders. Since I don't need to save, for example, ten copies of a graduation portrait of the same person, I recycle the folders to use in my artwork. That's what makes up the foundations for this tag.

It features a die-cut pattern of poinsettias (Tim Holtz) that were filled-in with Stickles along with a Christmas Collage Paper covering. I used a laser-printed vintage photo mounted inside an old Idea-ology sticker frame antiqued with paint and Liquid Pearls. The numerals were cut from scrapbook paper and covered with Stickles.

I'll share a tip for anyone who doesn't like the unavoidable shedding of glitter--just cover it with a layer of clear medium to seal it. And if you use a matt finish it creates a more subtle, vintage appearance.

I'm linking this one up to Simon's Monday challenge, this week's theme is Holiday Cheer.

As always, I hope this post finds you well and happy and I appreciate your visit.

Until next time, take care.

December 01, 2022

No. 4 for Christmas, 2022

I took inspiration for this tag from the cover of a vintage magazine (see it here). I traced the ornament design on watercolor paper and tinted it. I messed-up the background so I had to cut it out instead. It was pasted on Tim Holtz Christmas papers and embellished with Stickles.

As always, I hope this post finds you well and happy and I appreciate your visit.

Until next time, take care.

November 24, 2022

No. 3 for Christmas, 2022

I took inspiration for this Christmas tag from Paula Cheney and a piece she created several years ago for an Advent calendar (see it here).

I cut the wings from a vintage portrait folder and distressed with paint, sandpaper and crackle medium then mounted on paper, tissue scraps and fabric. The text was made with a Tim Holtz Christmas stencil and covered with Glossy Accents.

The crown was cut from a discarded book then covered with Stickles, Glossy Accents and Nuvo Crystal Drops. I outlined the edges with more Stickles and darkened them with a water-soluble graphite pencil.

The crowning jewel (so-to-speak) is a vintage button from my great aunt's collection.

As always, I hope this post finds you well and happy and I appreciate your visit.

Until next time, take care.

September 25, 2022

Elizabeth II

Who could not be moved by the most honorable life of Queen Elizabeth II? With respect to her passing, Simon's prompt this week is "Sparkle and Shine" and she certainly was all that and so much more.

"May flights of Angels sing thee to thy rest."


As always, I hope this post finds you well and happy and I appreciate your visit.

Until next time, take care.

August 31, 2022

Seedless Preserves

I usually keep my posts short and sweet since there are many craft bloggers that provide step-outs with detailed instructions and most of my work isn't, as they say, "rocket-science."

But this time I thought my readers might like a more detailed explanation of how this tag was made.

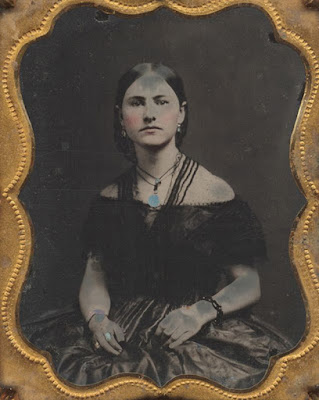
It began with an image transfer on heavyweight card stock after modifying this photo with Photoshop.

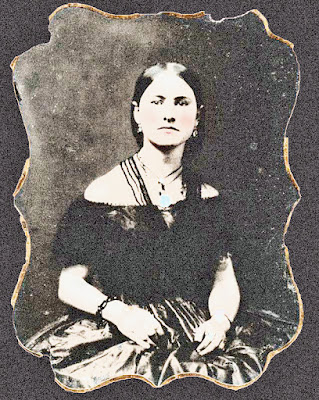
As you can see, the photo had damage (gray areas on flesh) that I corrected using the "film grain" filter followed by my usual image transfer technique. Here's the reversed image after editing.

I filled-in the hair on top of her head, redrew parts of her necklace and extended her eyebrows with waterproof black ink. I use a Uni-ball Vision Fine--it's been my go to for years. I scratched out the dark shadow beneath her chin and replaced it with lighter shading.

I trimmed and pasted tissue paper in the background using Tim Holtz Collage Papers and a Simon Craft Glue Stick. I seriously like these sticks--they have a long working time and clean up easy with water.

Her dress was decorated with plain white tissue paper stamped with dots (Tim Holtz Dots and Floral) and tinted with this post's title, Seedless Preserves Distress Stain. I don't think there is a more potent color in my toolbox than this one!

I made a mask of the woman's body so I could stamp the tree branches with birds in the background (Penny Black Winter Ledge). I painted over the bird bodies with white acrylic later tinted with light brown ink. I used inexpensive Pentel Oil Pastels to tint the background. They are mostly transparent (which is a great feature) and I just scribble on a bit and rub-in with a cosmetic sponge.

Some final tweeks include shading around the edges of the woman's face and arms to provide a little dimension and the addition of gold paint to her jewelry and the remaining frames edges. There's a spot of Glossy Accents on her turquoise medallion and the text is a Holtz Clippings Sticker.

I'm linking up to Simon's Monday challenge, this week it's Make Your Own Background.

As always, I hope this post finds you well and happy and I appreciate your visit.

Until next time, take care.

August 27, 2022

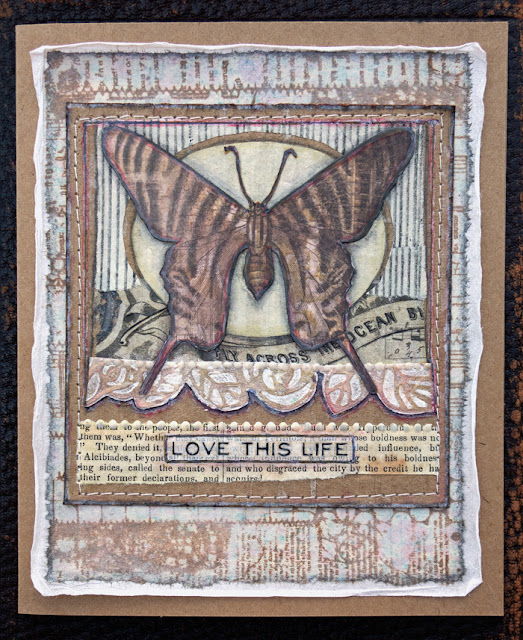
Love This Life

Greeting Card

Prompted by Simon's Monday challenge (Mixed Media), I made a card using kraft cardstock, layers of tissue papers (one stamped), a piece of delaminated cardboard, book paper, Tim Holtz Aviary Collage Paper, an embossed scrap (Roses Texture Fade) and the centerpiece is a moth clipped from the Wallflower paper stash.

I save most scraps from previous projects because they always come in handy for projects like this. 

I used a variety of inks and markers to tint/distress and embellished with a Remnant Rub, machine stitching and Nuvo Vintage Drops.

As always, I hope this post finds you well and happy and I appreciate your visit.

Until next time, take care.

Stamp credit: Carabelle Studio Stitched Mixed Media Background

July 30, 2022

Fish School


Altering vintage postcards or using them as a background is fun and I'm surprised how well the paper holds up to wet mediums.

I stamped the fish on tissue paper using a set bought many years ago at a craft fair. I used Pitt brush pens to tint them and Distress inks for the watery background.

I'm linking up to Simon for this week's challenge, "Back to School."

As always, I hope this post finds you well and happy and I appreciate your visit.

Until next time, take care.


July 23, 2022

Bird Post


I inherited my great Aunt Esther's collection of post cards and I used a pair of them to create a bit of mail art with some Stampendous birds.

One bird was stamped on plain tissue paper, the other on a vintage book page, and both were cut-out and pasted on the cards. I did this mainly because I could play around with the placement and avoid a mis-stamp that can't be undone. The pine trees and leafy dots were also done this way.

There's a bit of collage paper and miscellaneous stamping to fill things in and I tinted with colored pencils and ink markers.

I was inspired to make these by Simon's challenge this week, "Let's Go On Vacation!"

Both cards were mailed by Esther's sister while traveling through St. Louis (on vacation) and of course, birds are great travelers, too. 

Fun to see Ada was excited to report she procured a hotel room with a bath for $1.50.

My, how times have changed....

As always, I hope this post finds you well and happy and I appreciate your visit.

Until next time, take care.

April 03, 2022

No. 42


Recycle was the challenge over at Simon so I used the inside of a vintage portrait folder for a support, a layer of peeled cardboard, distress-stained parchment paper, a scrap of printed tissue paper, an altered metallic paper frame and one big, beautiful luna moth (Argema mittrei).


The moth image really inspired me (wouldn't it make a great stamp?) and it was printed, cut-out then mounted on a thick piece of cardboard and the edges were painted black.

I used a scrap of vintage lace and, while I can't explain it, I am always compelled to add dimensional dots which you'll see along one of the paper borders (Nuvo vintage drops). The text is a Clipping Sticker.

As always, I hope this post finds you well and happy and I appreciate your visit.

Until next time, take care.

March 24, 2022

Sunny Bee

Greeting Card

Prompted by Simon's Monday challenge to make something "Bright and Cheerful," I chose to use their Sunflower Garden stamp set and a mix of watercolors.

My somewhat less conventional mounting was done by cutting the watercolor 1/4" from the outside edge leaving two pieces, trimming the inside piece again to create a gap and then reassembling on black cardstock.

The text was die cut in multiples and stacked for dimension. The bee was cut from a pattern and lined with tissue paper to provide body color and luminescent wings.

As always, I hope this post finds you well and happy and I appreciate your visit.

Until next time, take care.
September 09, 2021

Sunshine Flowers


Simon says "stamp it" this week (no digi images) and it would be nice to use Simon's exclusive products. So that's just what I did.

The stamp set is called Sunshine Flowers and it was part of their monthly kit this month which I decided to splurge on.

I stamped the flower jar on preprinted paper by Lavinia (Scene Scapes Summer Meadow) then cut it out. This way, my flowers and the jar were already tinted.

The background is from who know's where (I've had it for ages); I did some trimming and layering (a portion covered by tissue paper) to create a suitable background for the jar. A bit of a shadow was added to the jar's base.

I didn't feel confident aligning the text (comes with the set) so I stamped it on tissue paper first then cut and pasted it on.

I used the Liquid Pearls that came with the kit to embellish the borders.

As always, I hope this post finds you well and happy and I appreciate your visit.

Until next time, take care.
September 05, 2021

Glimmersmitz

greeting card

A head start on Christmas cards? Maybe. But a call to create with "glimmer and sparkle" at the Simon Monday challenge was really the push for making this one. What's Christmas without some shiny bits--am I right?

I used Pink ombré paper (Martha Stewart) covered with Tissue Wrap (Holtz) trimmed to fit around Poinsetta Pieces die-cuts (Holtz) that were cut from a bronze metallic envelope.

Copper Liquid Pearls, some Stickles, and white Scribbles provided the glitz. I heat embossed the white text and outlined one side of the letters with an extra-fine black marker to create a 3D effect.

greeting card

As always, I hope this post finds you well and happy and I appreciate your visit.

Until next time, take care.

July 02, 2020

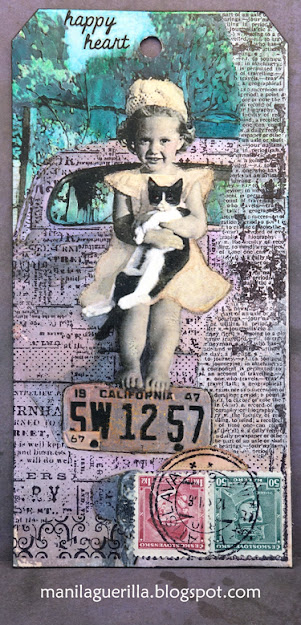
Happy Heart


"Take Me for a Ride" is the challenge at Simon Says Stamp this week so I altered this photo by creating an image transfer on a manila tag.


Then I used watered-down gesso to cover most areas with a small paint brush, applied a mask cut from deli paper and used a background stamp on the car's surface.

I used inks to tint the photo, applied some stamped tissue paper on the right-hand side, placed some vintage postage stamps in the lower corner and the text is a Remnant Rub

This tag reminds me of one I made last year (Maurice Crooks) which is a favorite of mine.

As always, I hope this post finds you well and happy and I appreciate your visit.

Until next time, take care.

May 22, 2020

Honey Bee


This post is all about the bees. Thanks to lots of rain some weeks ago, every plant here is in full bloom including the desert trees now covered with a blanket of tiny yellow flowers and just as many bees! The air is filled with the sound of them.

The Simon prompt on Monday was "We're All A Buzz" and given my namesake, how could I pass this one up?

I made a card using a stamp set by Simon called Delicate Flowers, the background paper is Epiphany by Prima and Nuvo Vintage Drops were used around the border.


I stamped the flowers on tissue paper and redrew some of the lines to sharpen them. I used Distress Inks for color and created a shadow effect around the frame edges with colored pencils.


As always, I hope this post finds you well and happy and I appreciate your visit.

Until next time, take care.

May 13, 2020

It's a Dog's Life


Inspired by this week's Simon Monday challenge, I'm sharing this journal page that features a trio of vintage canines (Tim Holtz Paper Dolls).

The background is the original cover page from a magazine which I hung on to because I thought it had potential.

It's tricky working with magazine papers as they tend to wrinkle and can be fragile so I use a glue called "Yes" because it doesn't buckle paper.

I used a stencil (Clarity Stamps Treescape) with some dark gray metallic paint and the birds were stamped on tissue paper before pasting down.

The paper dolls were peeled from their backing and most of the paper rubbed off to make them nice and thin which is my preference when collaging.

Both sides of the dolls were sealed with acrylic medium before assembly on the page to protect them and give them strength. I used various staining inks to tint them with a small brush.


As always, I hope this post finds you well and happy and I appreciate your visit.

Until next time, take care.

October 31, 2019

Unrequited Love


I've got a lot of pics to share today that illustrate the steps I took to create this journal page made for Simon's Monday challenge this week.

Art journaling can be/should be somewhat spontaneous and you'll see by the process that unfolded for this page, nothing was set in stone and I changed directions a few times.

Being flexible and just "going with the flow" is what makes the experience fun. Not to mention what you might learn along the way!

I began with transcribing a document then pasted word strips cut from it onto the page.

I covered the page with gesso and tinted some sections with gray then sanded it a bit.

I transcribed the last paragraph of my document over the top using a Fude Ball 1.5 pen.

The ink was taking FOREVER to dry so I sprinkled clear embossing powder on it and heat-set. It was messy but did the trick and I like the emphasis and durability it provided.

I used a vintage stamping set (circa 2008) and applied the flowers with black archival ink.

I wanted to create the illusion of flowers growing over and around a brick wall so I printed a photo of some brick, tore out sections and used my image transfer technique.

As you can see, the wall was modified quite a bit later in the process but proved to be a good jumping-off point which was just what I needed.

I used shades of gray to blend in the wall and began to tint the page with craft paints.

I didn't worry too much about "staying inside the lines" but the paint did blur the stamping so I went over the lines with a black pen marker.

Here's the finished product--it's a two-page spread in a Ranger Dylusions journal (8" x 11"):

Some details I didn't photograph but are worth mentioning: I used the Dot Fade stencil and white paint to unify the page and added the butterfly (cut from Tissue Wrap) along with some Collage Paper leaves (Tim Holtz products).